Posts Tagged ‘lamp’

Corner Light Epidemic

July 8, 2015

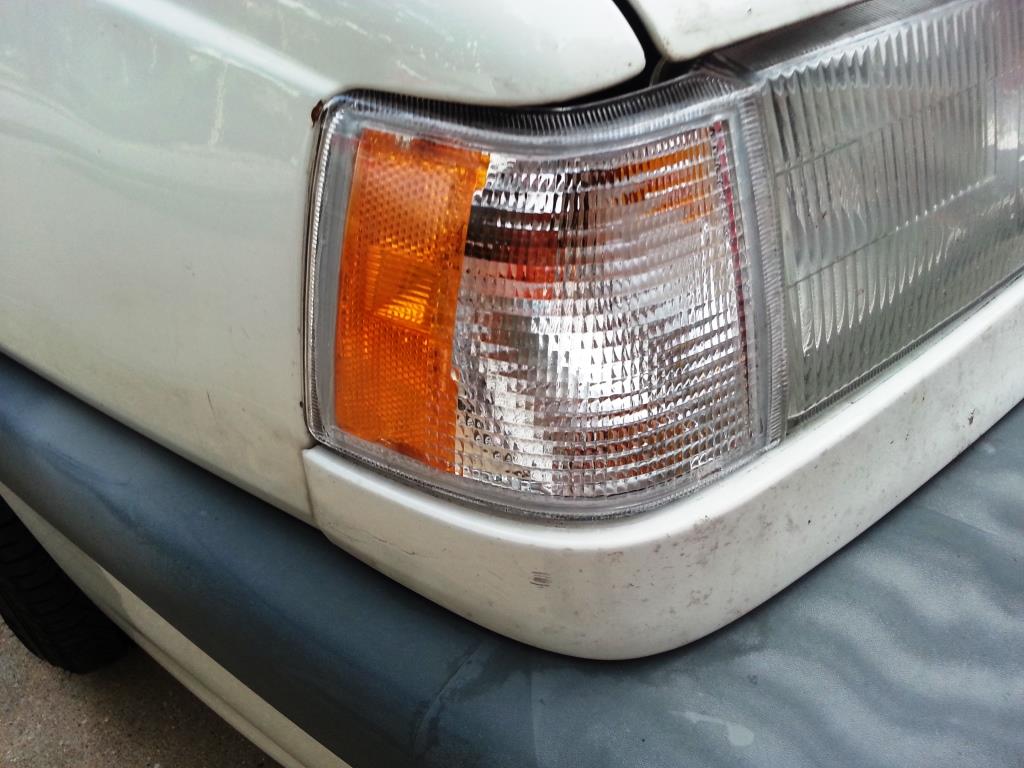
Well, just like the project car red wagon, the white 850 sedan lost its right front corner light (front parking/turn signal lamp) lens.  You can read up on the details in task #98 from last spring.  Based on feedback from some readers plus this experience, I’m ready to pronounce this common problem to be a plague or epidemic and recommend that all 850 owners check theirs and repair as needed.

Like the red wagon experienced last spring, the front right corner lens fell off somewhere down the road.

Like the red wagon experienced last spring, the front right corner lens fell off somewhere down the road.

It seems pretty obvious that the adhesive weakens and vibration causes the lens to drop off while driving; it’s gone forever unless you happen to know when and where it launched.  18+ years of heat and sunlight cause the glue to dry out and lose its grip on the lens.

Lens adhesive gets hard and crusty over time and loses grip on the lens.

Lens adhesive gets hard and crusty over time and loses grip on the lens.

New light assembly installed.  Easy and looks great.

New light assembly installed. Easy and looks great.

Because both 850s lost lenses I thought I should check the lenses on the left side of both cars.  The red wagon’s lens was secure but this white sedan’s lens popped off with almost no effort.  So it was due to fall off on its own, part of the reason I termed this an epidemic.

Left side corner light lens popped off while gently tugging on it.  Was ready to fly off on the road.

Left side corner light lens popped off while gently tugging on it. Was ready to fly off on the road.

The good news here is that the lens didn’t fly off while driving so we can repair it to save the expense of replacing the whole light assembly.

I used some clear silicone adhesive caulk to glue the lens back on the assembly and let it cure for a while while clamped.  Just for grins I tugged on it to make sure it would stay attached.

Glued lens back on assembly using clear silicone adhesive caulk and clamped it while curing.

Glued lens back on assembly using clear silicone adhesive caulk and clamped it while curing.

Repaired (glued) light assembly re-installed.

Repaired (glued) light assembly re-installed.

My recommendation for all 850 owners is to tug on their corner lights lenses to make sure they are secure.  This is best done with the hood (bonnet) lifted up for better grip.  If they are loose or pop off, congratulations!  You saved the expense of buying a new light assembly.  All you need do is glue it back on.

#98 Replace RF Corner Light Assembly

May 14, 2014

One day we noticed that the lens was missing from the right front corner light (front parking/turn signal lamp) assembly.

My first thought was vandalism where somebody smashed it but after examination I observed that the lens that wraps around from font to side was completely gone with no trace of damage.  It seems that the factory light assemblies have the lens secured with adhesive or tape.  Now I’m guessing that the glue simply came loose after 17 years of heat, sunlight and vibration and that the lens simply fell off while driving down the road.

Lens missing

Lens missing

??????????

Fortunately the lamp housing was still attached to the car and functional so no worries or hurry here.  Bonus that the Volvo part number is molded into the lamp housing and visible so I just wrote that down and went searching for replacements.  Had a hard time identifying this part on my favorite factory parts locator, volvopartswebstore.com, or in Vadis so I really did need the part number.

??????????

This particular part is Volvo 6817774 and costs over $70 with shipping for a new factory part.  That’s a little steep and I was hesitant to get a junkyard replacement because they are likely to be in poor condition.  After looking I couldn’t find any at a scrapyard anyway.  Back to the internet, I did find what appears to be a high quality aftermarket replacement with good customer reviews from Amazon.  Ordered one only to have the supplier inform me the next day that there is a recall on that part so they wouldn’t ship.  So I ordered another part on Amazon and it looks great.  Apart from plastic color I can’t tell much difference between the factory original part and this one.

Good news for this task is that it doesn’t require any tools.  Just open the hood and release the spring holding the assembly in place.

Removing old lamp assembly with missing lens.

Removing old lamp assembly with missing lens.

After unplugging the wiring harness we can work on swapping a couple of parts.

Remove spring and lamp socket from old assembly.

Remove spring and lamp socket from old assembly.

Side-

Side-by-side comparison of the old and new light assemblies.

Install spring and socket onto new light assembly.

Install spring and socket onto new light assembly.

Now just put the new assembly in place by plugging the harness in and inserting the module in place and locking with the spring hook.

New light assembly installed.  Looks beautiful.  Original one on left side seems hazy and crusty in comparison.

New light assembly installed. Looks beautiful. Original one on left side seems hazy and crusty in comparison.

Did a quick check of light function with running lights and turn signal.  Working fine so we’re done with this one.

Functional checkout OK.

Functional checkout OK.

Now I’m keeping an eye on other light assembly lenses on both cars to see if they show any signs of coming apart, or if this was a rare event.

$22.50

Update 7/8/15:  Lenses popping off all over the place and readers (below) seeing the same thing.  See my post entitled, “Corner Light Epidemic”.

#72 Headlights

November 24, 2012

One of the headlights was out and the lamp needed to be replaced.  This is a routine maintenance item on all cars but there are many different types of lamps and methods of access.

On this vehicle the lamps are replaced by unscrewing the round cover from the back side of the headlight assembly.

Circular back cover removed.

Twist lamp CCW to free and pull out of holder.

The wiring harness plugs directly into the lamp with a connector.

Installation of new lamp is reverse order.  Always use gloves when handling the lamp!  Never let your skin touch the glass bulb.  See tech note below.

Detailed instructions are found in the owner’s manual.

I wanted to have extra-high-brightness lamps for the girl’s safety while driving through wildlife-rich countryside at night.  So ponied up for these expensive Sylvania Silver Star Ultra lamps which claim to provide 50% more brightness than ordinary 9006 lamps.  They advertise up to 40% increased down-road visibility and to improve side-road (peripheral) visibility by approximately 50%.

These high-performance low beam lamps are very bright.

These high-performance low beam lamps are very bright.

Lamps should always be replaced in L/R pairs so they are equally bright, even if only one has gone bad.

Repaired cracked wiring in previous post (#71).

$46 for two high-performance lamps type 9006

Technical Notes:

Bright lamps such as used for headlights operate at very high temperatures.  Any natural body oils from bare skin will remain on the quartz bulb and cause an extra hot spot which will cause the envelope to fail quickly.  Always wear clean gloves when handling halogen lamps.  If you accidentally get oil or other contaminants on the bulb, you can clean it off with brake cleaner or other solvent (not rubbing alcohol, which has skin conditioning oils).

Most automotive headlights are halogen lamps which add a halogen gas (typically iodine or bromine) to re-deposit evaporated tungsten back onto the filament.  This allows the lamp to burn much brighter (and hotter) and still have a reasonable lifetime.  By recycling the tungsten back to the filament, halogen gases also minimize the opaque metal film from obscuring the quartz bulb.

#23 Odometer and Instrument Lights

February 19, 2012

Odometer was not working when we bought the car and the previous owner made that known.  Stuck at 144,416 miles but who knows how many miles were put on it since it stopped working?

This is a well-known problem with these models and it has a relatively inexpensive repair if you DIY.

The hardest part is getting the instrument cluster out of the dash, which requires removal of at least half of the dashboard cover and then muscling the cluster out.

Edit 7/28/2013:  While I lifted only the driver’s side dash pad/cover to pull out the instrument cluster (and most instructions say just do this side), I am re-considering this shortcut.  What I find is that it’s difficult to get the cover to seat properly in the center above the climate control when reassembling everything.  There are tabs that lock the cover into mating slots of the dashboard and it’s really hard to push them together at the center, resulting in a loose spot.  This is not only visually unprofessional but it allows the dash cover to make more noise when driving on a rough or bumpy road.  I recommend removing the dash cover completely, which is more work but gets better results and is easier to remove the instrument cluster.  A good half-removal procedure is found here:  Dash Removal.  I haven’t found a good written procedure on the web for removing the entire cover but the Haynes Repair Manual (which every DIYer should have) has good instructions.  IPD also has a very instructional video on this at Volvo S70 Dash Removal.

Then you have to disassemble the instrument cluster to get to the odometer assembly.

Then you have to take the motor end off the odometer assembly to get to this tiny soft plastic gear which is the problem.

Bought a replacement gear which is made of harder material so it should last more than 15 more years.  Compare the two gears here.  You can see the old one is very worn and a couple teeth are nearly gone.  That’s why the odometer stopped incrementing.

Replaced the gear and reassembled the instrument cluster and cleaned the visual area inside and out.

While the cluster was out I replaced the four backlight lamps for the gauges (two were burned out) and one for the time/temperature display (it was also out).

Reinstalled the cluster in the car and replaced the dash cover.  A little test drive proved the odometer works again so we can check fuel economy (mileage) now.

With new lamps you can also see the gauges clearly and the time/temperature display in the dark.

Gear + Lamps Kit $29.95

#21 Front Turn Signal Lamps

February 18, 2012

Replaced front turn signal lamps because turn signal flasher was clicking very erratically–fast, then slow–sometimes with a dragging sound.  Now the turn signals are fine.

Lamps must have been on edge of failure where the filament burn-out sensor was intermittently fooled.

Volvo has unique (to me) corner light assemblies held in place with a spring and pull clip.

$2.97

#18 Dashboard Lamps

February 18, 2012

Many of the dash board and instrument panel lamps were burned out so you couldn’t see the controls or clearly see the gauges at night.

I suspect a failed voltage regulator caused excessive voltage to damage the lamps.  This hunch is supported by a fairly new alternator (electrical generator with voltage regulator) and that could have killed the battery as well.

Most of the instrument and switch backlight lamps are like these little Volvo custom parts for the switches.  I buy a lot of parts mail order from after-market Volvo suppliers to save a lot compared to dealer prices.

Replaced dash lamps for various switches and the climate control panel.  Now you can see them in the dark.

5x $6.15,  2x $8.69