Archive for February, 2012
February 29, 2012
Glove box door was very loose when we bought the car. Found two screws missing on the right hand side securing the door to the dashboard.
You have to remove the glove box liner to get to these, which is a bit of a pain but not too bad. Had it out anyway to replace the air damper arm.

Bought new screws and installed them. Also tried to straighten the mounting frame a bit and adjust the door for better closure. Still a little loose to the upper left but not bad now.


2x $0.41
Tags:glove box
Posted in Glove Box | Leave a Comment »
February 28, 2012
Installed some dorky valve stem caps on all four tires after inflating to specified pressure. Tires should always be inflated to the spec on a label somewhere on any car. In this case, it is inside the fuel filler door.

These caps have a built-in pressure gauge where they show a green ring if pressure is near the specified value (36psi). If pressure drops below 32 or so, the green ring disappears. So the girls have an quick indicator of underinflated tires.

Proper tire pressure is very important for fuel economy and safe handling (steering, braking) because it affects contact with the road.
$5.64
Tags:inflation, pressure, tire
Posted in Fuel, Inflation, Tires | 1 Comment »
February 28, 2012
There is a climate control switch to select fresh or recirculated air when heating, cooling or just venting air into the cabin. This switch moves a motor one way or another which opens or closes a fresh air damper.
The plastic arm which connects the motor to the air damper was broken at the motor shaft so the damper was stuck open all the time. It’s the white plastic part in the photo wedged between the blower and motor bracket.

Not the worst problem in the world but there are times when you want recirculating air. Such as on a real hot Texas day when the AC is struggling to keep the cabin cool (chilling already cool air is much more efficient). Or when you’re stopped at a light and somebody has a real stinky cigarette next to you (blocks the smell). Plus the replacement part is cheap so it’s worth doing.
Replaced the damper intermediate arm. Kind of a pain since you have to remove the glove box and it’s easier yet with the glove box door removed and also the knee bolster below. Also not obvious how it connects together and getting it in position just right. I finally figured out the best way is to switch off the ignition while the motor is moving between fresh and recirculate positions. That way the motor shaft is moved halfway and clocked where it’s easy to get the keyed arm lined up with the square shaft. Replacement arm is now a black part, otherwise identical:

$6.90
Tags:air, damper, recirculating
Posted in Damper, Glove Box, Heating/Air Conditioning | 3 Comments »
February 27, 2012
Cylinder pressure is an excellent indicator of overall engine condition. It can reveal worn piston rings or cylinder walls or uncover a head gasket leak between adjacent cylinders, among other things.
Compression is checked after warming the engine up by removing all spark plugs (5, in the case of this B5254S Volvo engine) to connect a pressure gauge in each hole one-by-one.
It’s also important to disable the spark generator by disconnecting the control wires from the ignition coil

and disabling the fuel pump by pulling its fuse.

Crank the engine so that max pressure is attained for each cylinder, then record the value. I observed no pressure increase when the throttle was held open, which many insist be done.

Tests reveal rather low values (132,140,137,133,135 psi) but they are at least very consistent, which is the most important thing. On a 15 year old car with 150K miles, we expect some wear in the cylinders so compression will be lower than factory specs with a new, tight engine. Engine seems to have plenty of power and is not consuming or burning oil, so low compression is not apparently a big issue.

Top row numbers are under normal (dry) conditions. Bottom row is pressure reading after adding a bit of oil to the tops of the pistons (wet). Wet readings are good, close to new engine specs. The big increase from adding oil to the cylinder indicates piston ring wear, which doesn’t really jive with the lack of smoke or oil consumption. So we’ll have to see how this shakes out. Will check compression again after performing internal engine cleaning (Seafoam) to see if things improve.
I did observe that the plugs were fairly new and in decent condition but set to a very wide gap (.048″). They should be .028″, which I set them at. Em reports a bit more power and presumably mileage too with proper gap. Plugs will be replaced with new ones after engine cleaning.

Tags:compression, gap, plug, spark
Posted in Compression, Engine, Fuel, Ignition, Spark Plug | Leave a Comment »
February 25, 2012
Fill cap on top of windshield washer fluid reservoir was detached from its retaining ring. Main issue here is that with a loose cap it’s easy to drop the cap and have it fall down into the engine compartment where it gets lost or impossible to retrieve. Then debris can get in or fluid slosh out.

Not the biggest problem, of course, but cheap and easy to fix. Bought a new part and replaced it.

$4.62
Tags:cap, reservoir, washer, windshield
Posted in Reservoir, Window Washer | Leave a Comment »
February 25, 2012
Passenger side trim in cargo area was loose and could potentially snag something or get really broken. Found two clips broken or missing.

Installed new clips and secured trim properly.


2x $1.85
Tags:cargo, clip, trim
Posted in Trim | Leave a Comment »
February 25, 2012
Rear window washer nozzle was not spraying cleaning fluid. Worse, fluid would leak all over the trunk around the spare tire when you tried to operate the washer.
Found this little check valve (lets fluid go only one way) at the nozzle blocked off (no flow).


Because pressure built up when you tried to operate the washer, it blew the connection at two tubes apart in the trunk area.
Also found the filter near this connection to be full of gunk.

Tried to repair the check valve and was able to clear it out but still wasn’t working properly so ordered a new one plus a new filter.

Replaced the check valve and filter and re-connected everything and tested to make sure it works and no leaks anywhere along the line.


Put the trim back on.

Check Valve $10.19, Filter $5.21
Tags:filter, trim, washer, wiper
Posted in Filter, Valve, Window Washer | 1 Comment »
February 19, 2012
Not to worry, girls– this isn’t a creepy stalker, it’s an easy way for dad’s half-century old body to roll in and out from underneath the car easily when working down there.
Yep, I got me a shiny red low-profile heavy duty creeper.


Tags:creeper, shiny
Posted in Shiny, Tools | Leave a Comment »
February 19, 2012
One of the center vent louvers was broken inside where air could not be directed up/down and left/right. It was also partly obstructed by loose louver elements.
Removed louver (it just snaps out) and found that the master connector bar had popped out of place with nothing really broken. Just re-assembled properly and reinstalled in the car.

Tags:louver, vent
Posted in Heating/Air Conditioning | Leave a Comment »
February 19, 2012
Much like the transmission mount, the upper engine torque mount was shot. You can see the fractured rubber bushing which allows the engine to move excessively as the side-mounted engine twists front to back with engine speed changes. That is not only noisy but hard on the lower engine mounts and transmission. So it’s important to stiffen this up.

Replaced with an after-market polyurethane bushing which will last much longer but is stiffer so a little more vibration will be transmitted to the dash through the firewall.

A factory rubber bushing would be slightly cheaper but requires a special tool to press into the mount so these two-piece bushings are easier to work with and last longer.
$26
Tags:bushing, engine, mount, torque, upper
Posted in Engine, Mount | Leave a Comment »
February 19, 2012
Odometer was not working when we bought the car and the previous owner made that known. Stuck at 144,416 miles but who knows how many miles were put on it since it stopped working?

This is a well-known problem with these models and it has a relatively inexpensive repair if you DIY.
The hardest part is getting the instrument cluster out of the dash, which requires removal of at least half of the dashboard cover and then muscling the cluster out.

Edit 7/28/2013: While I lifted only the driver’s side dash pad/cover to pull out the instrument cluster (and most instructions say just do this side), I am re-considering this shortcut. What I find is that it’s difficult to get the cover to seat properly in the center above the climate control when reassembling everything. There are tabs that lock the cover into mating slots of the dashboard and it’s really hard to push them together at the center, resulting in a loose spot. This is not only visually unprofessional but it allows the dash cover to make more noise when driving on a rough or bumpy road. I recommend removing the dash cover completely, which is more work but gets better results and is easier to remove the instrument cluster. A good half-removal procedure is found here: Dash Removal. I haven’t found a good written procedure on the web for removing the entire cover but the Haynes Repair Manual (which every DIYer should have) has good instructions. IPD also has a very instructional video on this at Volvo S70 Dash Removal.
Then you have to disassemble the instrument cluster to get to the odometer assembly.

Then you have to take the motor end off the odometer assembly to get to this tiny soft plastic gear which is the problem.

Bought a replacement gear which is made of harder material so it should last more than 15 more years. Compare the two gears here. You can see the old one is very worn and a couple teeth are nearly gone. That’s why the odometer stopped incrementing.

Replaced the gear and reassembled the instrument cluster and cleaned the visual area inside and out.
While the cluster was out I replaced the four backlight lamps for the gauges (two were burned out) and one for the time/temperature display (it was also out).

Reinstalled the cluster in the car and replaced the dash cover. A little test drive proved the odometer works again so we can check fuel economy (mileage) now.

With new lamps you can also see the gauges clearly and the time/temperature display in the dark.
Gear + Lamps Kit $29.95
Tags:gear, lamp, light, odometer
Posted in Instruments, Lamps/Lights, Odometer | 5 Comments »
February 18, 2012
Car came with center rear brake light cover missing. It had been taped over but that was ugly and coverage was incomplete so it was distracting in the rear-view mirror when brakes were applied.


Ordered a replacement for this since I couldn’t scare one up in the scrapyard. Kind of expensive ($48) but I thought it was important. Color doesn’t match well but it’s better than electrical tape and does block all light from inside the car. I will look into darkening it up with some trim dye.

$47.26
Tags:brake, cover, light, rear
Posted in Cover, Lamps/Lights, Trim | Leave a Comment »
February 18, 2012
Replaced front turn signal lamps because turn signal flasher was clicking very erratically–fast, then slow–sometimes with a dragging sound. Now the turn signals are fine.

Lamps must have been on edge of failure where the filament burn-out sensor was intermittently fooled.
Volvo has unique (to me) corner light assemblies held in place with a spring and pull clip.
$2.97
Tags:flasher, lamp, turn signal
Posted in Lamps/Lights, Turn Signal | Leave a Comment »
February 18, 2012
Transmission mount (lower engine/transmission to frame) was shot. You can just make out the fractured rubber bushings. Engine moved excessively because of this, particularly when starting the engine or with acceleration/deceleration.

Replaced with a new after-market transmission mount which has polyurethane bushings which will last forever but are slightly stiffer so perhaps a little more vibration will be transmitted to the frame.

$89.95
Tags:mount, polyurethane, transmission
Posted in Mount, Transmission | 2 Comments »
February 18, 2012
Rear tailgate hatch would not stay up and this old broom handle came with the car to keep it propped open.

Problem common to all wagons and vans with liftgate. Gas springs which supply force to keep the hatch open fail over time.
Replaced gas springs on both sides and now the hatch moves smoothly and stays open nicely on its own.


Broom handle is in the trash can!
2x $37.41
Tags:gas, hatch, spring
Posted in Gas Spring, Tailgate | 1 Comment »
February 18, 2012
Many of the dash board and instrument panel lamps were burned out so you couldn’t see the controls or clearly see the gauges at night.
I suspect a failed voltage regulator caused excessive voltage to damage the lamps. This hunch is supported by a fairly new alternator (electrical generator with voltage regulator) and that could have killed the battery as well.
Most of the instrument and switch backlight lamps are like these little Volvo custom parts for the switches. I buy a lot of parts mail order from after-market Volvo suppliers to save a lot compared to dealer prices.

Replaced dash lamps for various switches and the climate control panel. Now you can see them in the dark.


5x $6.15, 2x $8.69
Tags:dash, instrument, lamp, light
Posted in Alternator, Lamps/Lights | Leave a Comment »
February 18, 2012
Only two rusty nuts were holding each license plate to the mounting frame, allowing the metal plate to rattle with vibration. Installed four shiny new cap nuts on both front and back plates.

8x $1.19
Tags:license, nut, plate, shiny
Posted in License Plate, Shiny | Leave a Comment »
February 18, 2012
Replaced rear license plate lamps. One was out and the other was on its way.

Not the most important feature of a car, but legally required and gives a cop an excuse to pull you over if there is no light.
$4.78
Tags:license, light, plate
Posted in Lamps/Lights, License Plate | Leave a Comment »
February 18, 2012
Gasket around fuel filler was retaining gas and rain water. Cleared out the drain hole to let liquids drip down to the ground.

While on this topic, the hook on the fuel filler door is for hanging the gas cap when filling up:

It’s easy to drive off and forget about putting the cap back on. If it’s hanging on the door there is a better chance of keeping it as opposed to sitting on the trunk or roof where it’s almost guaranteed to roll off.
Tags:drain, fuel, gasket
Posted in Fuel, Fuel Cap | Leave a Comment »
February 18, 2012
Driver’s side shock absorber in rear was shot; car would bounce up and down easily. Old shocks shown here; you can see the one is completely collapsed and useless. The other was weak and ready to fail.

Replaced shocks and upper mounts. Noise/ride is much improved. Considering how low this car is, I was surprised to find the lower end can be done without lifting the car. Upper end is not hard, just a few panels to remove to get to the mounts.


Struts (combination shock absorber and coil spring) on front are even more important but were recently replaced by previous owner so we don’t have to worry about those.
Shocks 2x $69.64, Mounts 2x $15.16
Update 1/28/14: For reference, the upper shock mounts are located behind the rear seats in sedans. Fold the seats down and remove fasteners to pull carpeted covers away.
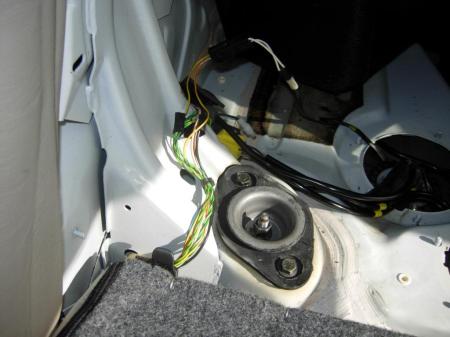
Right side shock mount on sedan located behind rear seat near fuel pump.
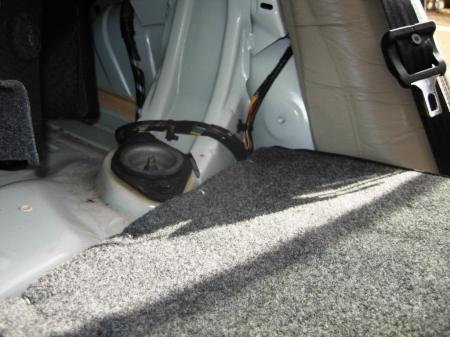
Left side shock mount on sedan located behind rear seat under cover.
Tags:absorbers, shocks, strut
Posted in Shocks | Leave a Comment »
February 18, 2012
Spare tire was nearly flat and jack/tools were loose and clattering around. Inspected and inflated spare tire and re-secured everything in the trunk properly. Made sure all the jacking and tire tools were accounted for.

Very few people think about checking spare tire pressure on any car. It’s wise to do so since your spare is of no use if it’s low or flat.
Tags:jack, spare, tire
Posted in Tires, Tools | Leave a Comment »
February 18, 2012
Headliner was sagging down. Not only annoying but partially blocking vision through rear-view mirror. Temporarily pinned it up with 16 special screw-in headliner pins.
Headliner will need to be replaced in the future.

Tags:headliner
Posted in Headliner | Leave a Comment »
February 18, 2012
Car came with only one key. Ordered two new keys made so both girls have their own and we have a spare at home.
Unfortunately these are high-security laser-cut keys which cannot be duplicated at the hardware store. A few professional locksmiths can do it but charge a fortune. Dealer price was steep but really the only way to go.
Got some fun key chains to go with them, too.

2x $59.95 + approx. $10 for key chains
Tags:chain, key
Posted in Key | Leave a Comment »
February 18, 2012
Slide-out cup holder was broken and unusable. Unlike many other cars, these 850s have only this one. So it was important to get the one working.

Removed armrest console and rebuilt the cup holder assembly with parts scrounged from a scrapyard. Good as new now (almost):

$10 salvage yard
Tags:cup holder
Posted in Cup Holder | Leave a Comment »
February 18, 2012
The old air filter was full of dirt and restricting air flow so installed a new one.

This is one of the important maintenance items on any car because it affects horsepower and fuel economy.
Mass air flow (MAF) sensor immediately after filter was nearly new so I didn’t need to clean that with a special chemical spray. Normally you would do this when the air filter is changed.
$16.59
Tags:air filter
Posted in Engine Air Filter, MAF | Leave a Comment »
February 18, 2012
Windshield washer nozzles were pretty gummed up; spray was weak and one was almost non-existent. Unclogged them with a tiny drill bit.

I’m guessing people before us weren’t using high-quality washer fluid. Probably mixed (or even straight) with hard tap water (high mineral content).
Tags:washer, windshield
Posted in Window Washer | 1 Comment »
February 18, 2012
Replaced burned-out cargo area lamp. Special bulb, not available in many auto parts stores. Now you can see in back at night.

$3.25
Tags:light
Posted in Lamps/Lights | Leave a Comment »
February 18, 2012
Anti-lock braking system (ABS) warning light was always on. Known problem with this car with ABS controller failing. Very expensive part but can be repaired with some effort for no cost.
The ABS module is removed from underneath the brake master cylinder with a bit of fuss and an uncommon E5 Torx socket.

Getting inside the ABS controller is the hardest part of this job. Pretty much have to destroy the case to get inside. Don’t worry, I sealed it up with silicone when it was reassembled.

Typical failure of the ABS controller is broken solder joints where the wiring connectors are attached to the circuit board. You can see how after 14 years of vibration the big pin in front has a crack in the solder joint.

Touched up all the solder joints on both interface connectors and reassembled the module. Reinstalled the module in the car. After driving the car above 12mph, the ABS warning light turned off. 🙂
Reports that ABS module failure causes the speedometer and odometer not to operate apparently apply only to electronic speedometers and odometers. On this car the speedometer always worked. The odometer had failed for mechanical reasons (see separate post for this).
Tags:ABS, brakes
Posted in ABS, Brakes | 2 Comments »
February 18, 2012
Safety light inside driver’s door panel was broken and loose. Replaced lens portion with a part scrounged from a parts scrapyard. Now other drivers can see when you swing the door open at night.


$5.00 (Salvage Yard)
Tags:door, light
Posted in Door, Lamps/Lights | Leave a Comment »
February 18, 2012
Driver’s door made a creak and popping sound. Found lower nut missing from the door prop/check bracket. Secured it with new fasteners and now all is well.

Actually, it still makes a clicking noise inside so I may still have to take the door apart and see if the check needs to be replaced. But it’s much better than it was.
Update: Replaced the door prop in #48.
Tags:door, noise
Posted in Door | Leave a Comment »
February 17, 2012
Hard to see from this photo but there was a huge spider crack in the windshield right in the driver’s field of view. Needed to be replaced.
Too bad the beach parking sticker had to go.

Shiny new windshield now installed. One of the few things we paid a professional to do.

$150
Tags:shiny, windshield
Posted in Windshield | Leave a Comment »
February 17, 2012
Most immediate problem with this car is that it wouldn’t start without jumper cables. Battery had to be replaced. Expect a 3 year battery life here in the Texas heat.

Only sure way to check battery condition is to use a sophisticated analyzer. I have one that checks voltage, charge level at specified cold cranking amperes (CCA) and internal resistance. Here you see the new battery is perfect while the old one was toast.

Battery hold-down clamp was missing. Installed a clamp which I scrounged from a parts scrapyard. It is important to keep the battery from moving because motion stresses critical wire connections.

Chemically treated anti-corrosion washers installed with new battery after using a special wire brush to clean the terminals. Also sprayed a corrosion protection coating on the terminals.

Battery connections are very important and many strange electrical problems are caused by loose or corroded connections on any car.
Car was also missing the battery positive terminal cover which prevents incidental sparks should a metal tool touch a grounded part and the + terminal at the same time. Installed a new one which was surprisingly cheap from a mail order distributor.

Approx. $100 for battery, anti-corrosion washers and spray
$5 for clamp from salvage yard
$1.18 terminal cover
Tags:battery, corrosion, cover, electrical, heat
Posted in Battery, Tools | Leave a Comment »
February 17, 2012
Since I will be doing so much work on this car, I decided to get a roll-around tool cart. Running in and out of the garage constantly for tools and supplies gets old and is inefficient.
Note the Haynes shop manual with a red wagon, just like this one.
The shiny red cart is a coincidence.

Tags:shiny, tool
Posted in Shiny, Tools | Leave a Comment »
February 17, 2012
Now we have two Volvo 850s in the household. Just need a blue one and we’ll be very patriotic.

Posted in 850 | 1 Comment »
February 17, 2012
Interior is worn but reasonably clean, especially compared to other 850s we looked at.
Girls can do some interior detailing if they want to make it cleaner and smell better.

Tags:clean, interior
Posted in Uncategorized | Leave a Comment »
February 17, 2012
Before buying the car I looked it over with an experienced eye and test drove it, checking for major issues or particularly expensive repairs and any real safety concerns.
Overall the general condition of the car was OK. It was drivable but needed a lot of little things, none of which were urgent; it could be worked on for months to spread out the effort and cost of getting it fully functional and reliable.
The car had recently passed Texas state inspection, so nothing fundamentally was wrong. Some recent work had been done based on owner’s report or by my own observation.
No fluids leaking, which is always a good thing, but a pleasant surprise.


Brakes felt solid and performed well and appeared to have quite a bit of life left on the pads front and rear (more so on front).


Front struts had been replaced recently, so that is one big job I won’t have to tackle.

Two new-ish tires on rear and the front ones had reasonable life left in them.

Engine ran well with decent power and no smoke out the exhaust.
No warning lights and no trouble codes on the OBD2 scanner.
Transmission shifted a bit rough but was functional.
No rust or structural issues, just minor cosmetic imperfections.
Alternator appears to be fairly new. I suspect the original voltage regulator failed over-voltage (many lamps burned out) and they replaced the whole alternator.

New crankshaft speed sensor:

and mass air flow (MAF) sensor:

Apparently somebody was trying to troubleshoot some kind of problem based on error codes or symptoms.
Air conditioning works but I did not check pressures or cooling efficiency. At least it’s not dead so some hope for it working well long-term.
Clunks, bumps and rattles all seemed to be something that could be managed one-by-one.
It will only get better from here…
Tags:general
Posted in Alternator, Brakes, Fluids, General, MAF, Sensor, Struts, TPS, Transmission | 3 Comments »
February 17, 2012
Not bad for a 15 year-old car.
The craigslist ad referred to it as “shiny”, which caught our attention because it is a fun term used in the Firefly TV series.
To be honest, the paint is a bit dull but we’re OK with it as-is.

Minor dings and paint scuffs, but otherwise in good shape.

Tags:exterior, paint, shiny
Posted in 850, Paint, Shiny | Leave a Comment »
February 17, 2012
This is why I want my girls to drive a Volvo. This 850 was stopped and got rear-ended at 55 mph. Car was wrecked but nobody was hurt inside. Typical and famous characteristic of most Volvos.

They are also very reliable and long-lived, particularly the 850 engine.
For both of these reasons I feel good about having my daughters drive around in this car.
In addition, I have been driving a Volvo 850 sedan since 2003 and maintaining it so have familiarity with how it works and what goes wrong and how to fix this model. Thus I have some specialized tools and knowledge about the car.
As an engineer, I also appreciate working on this car because it seems to be fairly well designed for serviceability. Compared to most other cars, this one is easy to work on and seems to be an “engineer’s car”.
Another bonus in having two of the same car is that I can compare assembly, fit, behavior or whatever between the two, or even swap parts to get one or the other working or to see if it solves a problem.
Tags:crash, reliability, safety
Posted in 850, Safety | Leave a Comment »
February 17, 2012
…when a neighbor smashed into my girls’ minivan parked at the curb. His insurance gave us very little money to total it so we had to get something in the $2500 range.
After looking into replacement minivans and not liking what we found for the money, we thought about a small sedan. We didn’t care much for that either, especially since two college girls will have a bit of stuff to haul around when they go back and forth to school. A wagon is a nice compromise between a minivan and a sedan.
Driving and repairing a 1997 Volvo 850 myself for 8+ years now, I am very familiar with the model and working on it. Good, reliable car if you take care of it, and a nice ride. Legendary Volvo safety was a big selling point. Nearly indestructible engine. So we searched for an 850 or V70 wagon. After looking at a couple local ones, we found a nice red wagon in town at a good price. After a visual inspection and test drive I decided it was in fairly good shape. Needed some work but drivable. Paid cash and registered it. No title problems so now we can put time and money into it.

Posted in 850, Safety | 1 Comment »
February 16, 2012
No future posts, no comments

I wanted to document my efforts in fixing up a 1997 Volvo 850 wagon to help my three children understand and appreciate what it takes to get an older car fully functional and running reliably. They may be doing something like this for themselves in the future, so this blog is for their reference. If it helps other Volvo 850 owners along the way, all the better.
Parts and labor at most shops–Volvo dealers in particular–are very costly. This effort approaches reasonable economy if you do it yourself (DIY), so most everything shown was done at home where labor is free. Cost of parts is given at the end of each task.
Postings are presented in order of task performed with most recent at top. Seemingly random, I did these tasks as time, parts and weather permitted and issues were observed. Previous owners had some work done already so I did not need to tackle those items which might seem more urgent (brakes, tires, struts).
Note: This is not a step-by-step repair document. It shows only the basic task accomplished. There are plenty of internet repair forums for this. However, many posts are detailed and somewhat educational (explanation of what/why/how). I don’t pretend to be an expert or authority on Volvos; this blog is just sharing my experience and opinions with my kids and other readers.
Jim Peisker | Cedar Park, Texas
Tags:850, Volvo
Posted in 850, General | 39 Comments »


